GIT branches
Studymaterial
Baggrundsmateriale: Gratis e-bog her
Brug denne interaktive tutorial til at lære git branching
Gå direkte til dagens emne omkring git branching her
Workshop emner
Quick recap:
- Creating repository on github
- Add collaborators (team members)
- Cloning repository
- git commands like: add, commit, push, fetch, merge, stash
Branches
- Create branches
- Merge branches
- Feature branch workflow
- Merge branches with rebase
- Forking a project vs. branching
- Making a pull request
- Using git issues
- Labels and notifications
Git overview
- Version control system and why we need it
- Local version control (copy folder and rename to higher version)
- Easy to confuse what folder to work and update
- Centralized version control (central server containing the different versions for collaboration)
- Single point of failure
- No backup of history in other places
- Distributed version control (Like git)
- Every client has a mirror of the entire repository
- Enables more advanced workflows with diffente users on different remote repos
- Git is like a mini file system where data exists as a stream of snapshots
- Most git happens locally
- increases speed and accesibility
- All commits are checksummmed with SHA1 hashes
- 40 character string in hexadecimal (0-f)
-
Git almost only add data (all changes can be reverted)
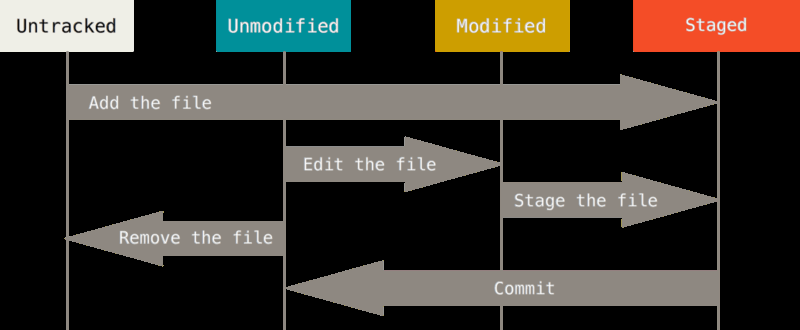
- 3 states of data
- Git repository ( .git folder contains info for the whole commit history)
- Staging area / the index (a file in .git contains info about what goes into the next commit
- Working directory (files on harddrive that we are working on now).
- Git workflow
- You modify files in your working directory (file in your local repo actually on the harddisk).
- You stage the files, adding snapshots of them to your staging area. (git add
) - You do a commit, which takes the files as they are in the staging area and stores that snapshot permanently to your Git directory.
- 3 stages of files
- committed (file in its actual form is registered in the git repo
- modified (file has been changed or created since last commit)
- staged (file has been added (git add
) to index)
Global settings
-
Insert your identy into git
git config --global user.name "<username>"git config --global user.email <email>
- Insert your prefered editor
git config --global core.editor "'C:/Program Files (x86)/Notepad++/notepad++.exe' -multiInst -notabbar -nosession -noPlugin"- test this inside a git repository with:
-
git config -eopens the repos configuration in the default editor. - Get help in the console
git helpFor overall commandsgit help <some command>get specific info about the command.
First repository
git clone <remote repo> or
git init inside a directory to make it a git repo.
Small exercise in basic git/github
- Create a repo online from github.com
- Create github repo
- Add collaborator
- clone the project
- add .gitignore
- add netbeans project, add, commit and push
- See result at github
- Create some changes on the remote repo and commit
- fetch and merge locally.
- try merging when there is unstaged content in working area
- then use
git stashto temporarily remove the dirty files - make the merge
run git stash applyandgit add .to put the stashed files back into the staged area.
- Starting locally (do this one at home)
- Create netbeans maven project
- git init
- git add, commit
- on github create new repo
- git remote add origin
e.g. url to github repositoyr - git push -u
eg. `git push -u origin master` -u is short for --set-upstream
Hint: you can work with git locally without ever needing to push to remote (if you dont need to collaborate with others / or backup in cloud)
Small exercise done in pairs
- Person1 greates a new git repository in github
- Then add the other person as collaborator
- Then add a README.md file to the project
- Then commit.
- Then clone to local machine
-
Then send url to partner
- Person2 clones the project
- Reads the readme file and add a comment to it
- Then stage and commit the file
-
Then push to github
- Person1 now adds a .gitignore file to the root folder
- goto
http://gitignore.ioto create the file content -
ignore all netbeans, java, windows, mac os specific files
-
Person2 now creates a new netbeans maven web project inside the new git repository and add, commit, push
- Person1 fetch and merge
- Verify that all files are there. Compare working directory on both computers and see what files were not contained in the commit.
Finally delete the repository both remotely and locally
Lets demo

Demonstrating how files move through the states with git status:
- Inside an up-to-date repo - create a new file
- git status
- git add
- git status
- git commit
- git status
- git reset HEAD~1 (semi-hard reset) //Moves HEAD pointer to previous commit (not touching the working tree BUT unstaging any changes)
- git status
- git add
<filename> - git commit -m “explanation here”
- git reset –soft HEAD~1 (soft reset) //Moves HEAD but keeping the index/staged area (still not touching the working tree)
- git status
- git commit
- git reset –hard HEAD~1 (hard reset) //Moves HEAD (and changes the staged area AND the working tree)
- git status
- Inspect the folder (file is no more)
Small exercise
Work individually and locally
- Create a new git repository (use
git init) - add a file to the folder (add and commit)
- Create changes to the file (add and commit)
- Go back one commit with git reset removing your changes from the file.
- Add some changes to the file and commit again
- Now go back 2 commits (Hint: use git reset HEAD~2) so that the file is no longer there.
- Create the file again wiht content and add + commit
- Change file and commit again
- Do a reset in a way that working tree is not changed but staging area is.
- Open the file, make changes to the file and add + commit.
- Make changes to the file and add
- Make more changes to the file and do
git status - Check the message and see how there are 2 versions of the file
- inside index and
- an unstaged version
- inside index and
Git diff
- 2 major purposes
- See exactly what you have changed but not yet added/indexed
- See what has changed in the index since last commit
Lets demo
Demonstrate git diff
- Inside up-to-date repo
- add new file with content
- git status -s //S for short version (less verbose)
- git diff (end with ctrl+C) //difference between working tree and staged area
- git diff –staged //difference between staged changes and last commit
Remove stuff from staged area with git
- Keep file in working tree BUT remove from staged area
- Like you would need if you added some unwanted files before making the .gitignore file
git rm --cached <file name>or if everything:git rm --cached -r .(-r for recursive)
View the project history - git log
git log- lists the commits made in that repository in reverse chronological order
git log -p- list commits with changes made since previous commit
git log -p -2//only last 2 commitsgit log --pretty=format:"%h %s" --graph- shows commit graph with formattet log %h (short hash) %s (subject)
git log --pretty=online- shows the commits on each a single line
Undo stuff
Overwrite previous commit message
- Only if nothing new has been staged
git commit --amend
Undo staging (remove file from staged area)
If you did git add and regret it
git reset HEAD <filename>- Takes the file out of the index
Undo changes since last commit on a particular file
git chekout HEAD -- <filename>//- This changes the working tree to be like the last commit
- WARNING: this is irreversible since git overwrites the file with other context there is no way to get back the original content.
Undo changes since last commit on all files
git reset --hard HEAD~1//changes working area back to state as it was at last commit
Undo last commit entirely
git revert HEAD//keeps the last commit in history but adds a new commit with the content of the previous (Working tree will be restore to how it was at the time of the last commit)
Small exercise
- create a new git repo with
git init - create a text file in the repo and add + commit
- add one more file and commit
- add one more file and stage it (no commit)
- Now reset working area to last commit (remove changes done to index/staged area)
- Then undo working area back to the first commit
Remote (eg. github)
Remote is a server that can host our repository like
- github
- bitbucket
- gitlab
- more..
Set up reference to remote
- by cloning a remote repo
git remote add <some name> <url>//git remote add + a name for the remote + the url for the remote- You can add several remotes if you like
- If you clone - then the name will be ‘origin’
- see list of remtes
git remote -v
Tagging
Tags in git can be used to reference a particular commit (e.g. version1 or sprint1)
- tag the actual commit:
git tag -a v1.0 -m "some message here"- This will create a tag on the last created commit with name: v1.0 and a message
- See all tags
git tag- See info about a specific tag
git show v1.0- Push a tag to remote (Doesnt happen automatically)
git push <remote name> <tag name>//eg.git push origin v1.0- To checkout a particualar tag (Not recommended in most cases since tags are history)
- You have to create a new branch and start it from the commit with the particular tag
git checkout -b <branch name> <tag name>//e.g.git checkout -b newdirectionfromv1 v1.0
Git alias (Not necessary but maybe nice to have)
Git aliasses are typically longer commands refered to with a few key strokes. This can be usefull if you find you have long commands that you are using frequently.
- Examples
git config --global alias.unstage 'reset HEAD --'//git unstagewill now unstage file: git config --global alias.last 'log -1 HEAD'//git lastwill now give the last commitgit config --global alias.add-commit '!git add -A && git commit'//combines 2 commands into onegit config --global alias.hist "log --pretty=format:'%h %ad | %s%d [%an]' --graph --date=short"- Create your own……?
Modify the bash.bashrc file (windows)
You can write new commands to the git bash (teach it new tricks):
Located at: C:\Program Files\Git\etc
Try adding this:
function gitp() {
    git add .
    git commit -a -m "$1"
    git push
}
Now you can open git bash and inside a git repo you can use the command: gitp “commit message” to add, commit and push in one single command.
Small exercise
- Create a few aliasses
- Create a new repo and do 4 commits
- Add tags to commit no. 2 and 4
- HINT: use
git log --pretty=onelineto see the commits andgit tag -a <tagname> <part of (7 or more chars) commit checksume.g. git tag -a v1.0 9fceb02
- HINT: use
Basic git homework (only if you have the time)
Your exercise for today is here AND
before tomorrow - follow this interactive tutorial here
Dagens egentlige emne: Branching and merging
Studymaterial: git book (pro git) page 89-95
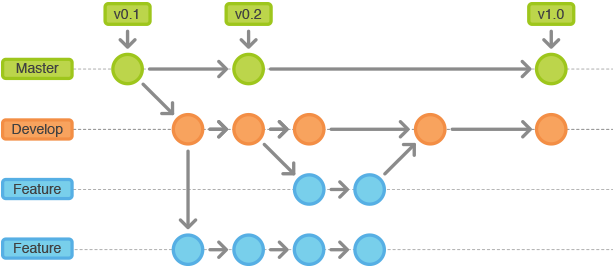
What are branches?
- Branching means you diverge from the main line of development and continue to do work without messing with that main line.
- Branch is a pointer to a commit
- All commits (except for the first one) has a reference to its parent.
- When starting a new branch from e.g. master - both master and the new branch are references to the last commmit.
- the next commit if on
will be a commit that is not on master (and vice versa) - Then if we checkout master and make changes and a new commit (these changes will not be in
)
- the next commit if on
Why would we need branches?
- To work independently on a feature without involving the rest of the project.
How should i branch
- “Branch early and branch often” // and merge (in the branch and delete it) equally often (when the feature is tested).
git branch <branch name>//Creates a new branch from HEAD (the pointer to the current commit)git checkout <branch name>//moves HEAD to the other branch (next commit will now be on this branch. HEAD can only point to one commit at a time (the commit that will be the parent of the next commit)
Create new branches
- Creating a branch just creates a new pointer to the current commit
git branch <branch name>creates a new branch by that name.- there should now be 2 pointers to the current commit (master and the new branch)
git branchshows what branches there are- the asterisk (*) before the name of one branch tells which one is active.
- making a new commit will move HEAD of the active branch
git checkout <branch name>changes current branchgit checkout -b <branch name>creates and checks out the new branch
Push branch to upstream
- when a branch is created and checked out locally - we cannot push to master
- we get this message:
fatal: The current branch development has no upstream branch. - So when we push we need to do it like this:
git push --set-upstream origin development(if origin is our host and development is the branch)
branches are easy to move around and often refer to different commits as work is completed on them. Branches are easily mutated, often temporary, and always changing.
Changing branch
IMPORTANT:
- Git resets your working directory to look like it did the last time you committed on that branch.
- It adds, removes, and modifies files automatically to make sure your working copy is what the branch looked like on your last commit to it.
- When we change branch we just move the HEAD pointer to a new branch (which itselfes is a pointer to a commit)
- When we want to change branch we will not be allowed to do so if
- uncommitted changes in the working area or staged area conflicts with content in the branch we want to change to
- Solution is to commit all before we change branch.
Lets demo
Demonstrate creating branches and commits in each branc
-git branch development // or git checkout -b development -creates and checks out in one command.
git checkout developmentvim somefile.txt//Add some text in the new file and hit Esc :wq to save and quitgit add .andgit commit -m "added somefile.txt"git checkout mastervim newfile.txtgit add .andgit commit -m "added newfile.txt"git log --oneline --decorate --graph --all
Small individual class exercise
- Create 3 branches
- Check them out individually and add a file and commit in each branch
- run:
git log --oneline --decorate --graph --allto see how your git branches look now - create an alias so that you can run the command in this prevous line by just writing
git graf.
Small exercise in pairs
Work in pairs to:
- create a new repo on github
- clone the repo to local repo
- Person1: Create a new branch named: development (there will now be 2: master and development
- commit some changes to development and push to remote
- Person2: fetch and merge the new branch (do this from a clean index and working area - eg. all is committed)
- Both Person1 and Person2 create new branch containing your name and push it to remote.
- create a new branch each with your name in it.
Merging
- First checkout the branch you want to keep then. (Maybe you need to pull latest version of the branch from the server first.)
git merge <branch name>mergesbranch into current branch - Now checked out branch points to the last (merged) commit.
-
- Delete the branch that was merged in
git branch -d <branch name>
- Delete the branch that was merged in
Quit merging:
git merge --abortto stop merging
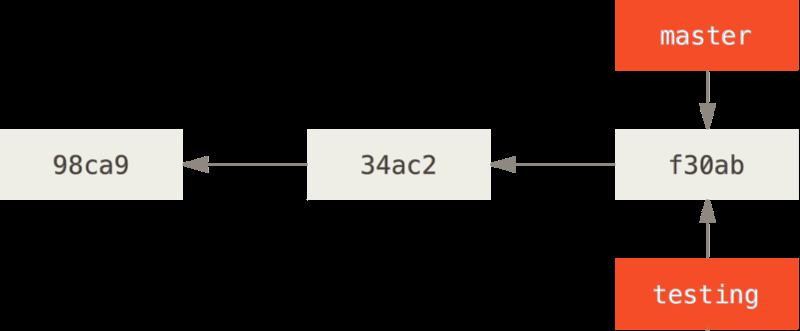
Fast-Forward merge
- A fast-forward merge is a merge in which the head of the branch you are trying to merge into is a direct descendent of the head of the branch you want to merge (E.g. there has been no unshared commits on the current branch since the new branch started off of it).
- Image below shows how C4 is a direct desendant of C2 and therefore fast-forward merge to master is possible.
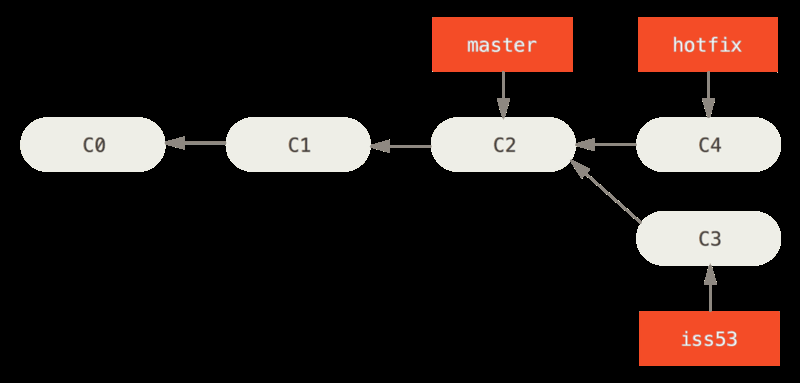
Three way merge
- Different from fast-forward since the commits/branches being merged does not descent of each other
- Instead they share a common commit somewhere back in history
- the 2 commits being merged + the common ancestor are used in a three way merge
- Results in a new (merge-) commit that has 2 ancestor commits (each of the branches)
- Will create a conflict if same section(s) in same file(s) has been modified by both branches
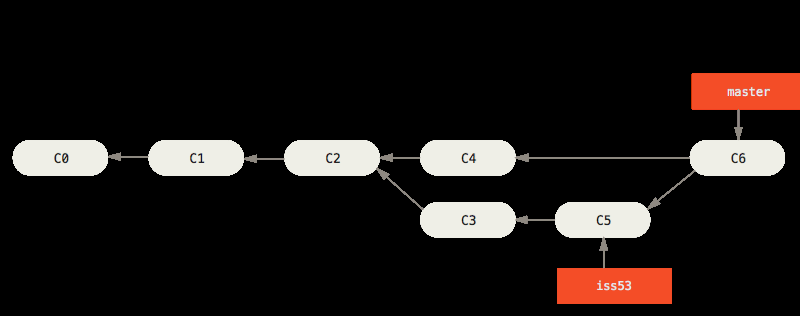 image shows how iss53 branch is merged into master with three-way-merge using C5+C4 and their common ancestor C2 to create a new merge commmit: C6 which master will then point to (and now iss53 can be deleted)
Merge conflicts
When you git merge and it creates a CONFLICT do git status and it tells what to do
- The file(s) that have conflict(s) must be resolved and then
git add <file> git addresolves the conflict (the added file will be the version going forward)- Even if the file is not changed (still contains «««««««< and =============== and »»»»»»»»)
git commitwill now finalize the merge.- Resolving merge conflicts often require discussing what changes to keep between all members of your team (or at least the people who wrote both changes that conflicts.
Lets demo
Merge conflicts
- create a new repo
- make some file - add - commit
- Create a new branch
- In each branch master and mybranch change the text file (one: deletes a line and two: change the line)
- Commit each branch
- Merge mybranch into master
- git status
- Look inside the file and see how to solve the conflict
- Solve the conflict and commit.
Small exercise
- Create a new git repo
- Add a text file to the repo and run:
git add .andgit commit -m "initial commit" - checkout a new branch: feature1
- do some changes to the text file - save - git add
- git commit - checkout a new branch: feature2
- do some changes to the text file - save - git add
- git commit - merge the two branches and resolve conflict
Rebase
- To get a straight commit history
- As if the work done in the 2 branches were done sequentially (not in parallel)
git rebase <branch name>means our current branch will have all its unique commits copied onto thebranch - the original commits still exist for some time but without a reference to them (no pointer)
git checkout <branch name>andgit rebase <original branch name>Now ensures that both branches are updated and pointing to the same commit end pointgit rebase <branch1> <branch2>- add (copies) all commits from
onto and attaches head to - if
is an ancestor to then there is no need to copy any commits to from instead will just point to and HEAD will be on
- add (copies) all commits from
- ONLY rebase local commits (never commits that has been pushed to remote. Because it changes history that others might depend on)
Changing (moving commits) existing branches (Practise this here)
- HEAD is the currently checkedout commit
- Normally Head points to a branch name
- Detaching HEAD
- Means to checkout a commit (instead of a branch)
checkout <commit hash>This detaches HEAD from the branch to the specific commit- commits made in detached HEAD state are not lost!
- Do this:
git reflog//Shows all the commits - find the one to recover- create a branch at that exact commit:
git branch <branch name> <commit hash> - Then the new branch can be merged with a proper branch.
- Or this
git cherry-pick <commit hash1> <commit hash2> etc...//Adds the commits to the end of current branch (and move branch pointer to the last commit)
- Do this:
- Relative refs:
- One commit up:
^ Master^Means the first parent of Master<branch name>^^Means- grand parent of that specific branch.
git checkout HEAD^^means: ‘go back twice up through the commit tree’.git checkout HEAD~4means: ‘go back 4 times from current commit.’
- One commit up:
- Moving a branch to another commit:
git branch -f master HEAD~3means to move the master branch back to the commit 3 commits previous- This just means that the pointer: ‘Master’ now points to that previous commit
- (To move HEAD just use
git checkout)
- Reverting changes
git reset <commit hash>/or relative ref- This just moves the current branch to a previous commit - Like rewriting history (the later commits then never really happend).
git reset HEAD~4Moves the current branch back 4 commits ago.- This works well locally on your own computer
- Does not work on a shared repo/ remote branch - where other people are working on the later commits
git revert <commit hash>- This makes a copy of the specified commit and puts it after the last commit and then attaches the current branch to this new commit. In this way the repos content is reverted to the previous commit without loosing any history.
- Copy a number of commits to the current branch
git cherry-pick <commit hash> <commit hash>This copies the specified commits to the current branch and moves the head to the last of the commits.- The commits that are copied can be from different branches
- Change the commit history
- Interactive rebase means opening an editor to rearrange and remove commits
git rebase -i HEAD~4opens up the last 4 commits for rearranging. Either change the order or ‘pick’ commits which will remove them from the list of commits that then will be copied on to the last commit (before the 4 that were chosen for change) and the current branch will point to the last of the copied commits.
- Cherry-pick example
git checkout masterwhich is parent to the develop branchgit cherry-pick C2which is a commit further up the line in the development branchgit commit --amendchanges the current commit (C2)git cherry-pick C3the last commit in the development branch- So now master is pointing to the development branch (merged) and C2 was changed with some content
Small exercise manipulating branches
- create a git repo
- make 3 commits in master
- make 2 new branches: development, feature1
- create 3 commits in both development and feature1 (files need to be created or changed in each commit)
- Move feature1 to the head of development
Git issues
- Issues are like user stories in a scrum team or
- Task tracking system with notifications, discussion forum and project planning tool.
- See more here
Git milestones
- Use mile stones to attach to issues (This ennables us to set deadlines on our issues and to use issues for sprint planning)
- Use labels to
Git issues - labels
- Labels are for issues a way to categorize issues (often across multiple repos)
- See example here
Small exercise with issues, milestones and labels
- In the last repo you created
- create 3 milestones
- Create 2 label: ‘new feature’ and ‘java servlet’
- create 3 isssues and tag them with labels and milestones
- add Assignees to each issue
Git forking
- A fork is a copy of someone elses repo.
- Usually done because you want to use their repo as a starting point for your own project.
- See more here
Git pull request
pull requests are a mechanism for a developer to notify team members that they have completed a feature. Once their feature branch is ready, the developer files a pull request
Extra exercise for the dedicated
The exercise is here